Floral Wallart DIY
November 18, 2013 § Leave a comment
- Floral Wallart DIY
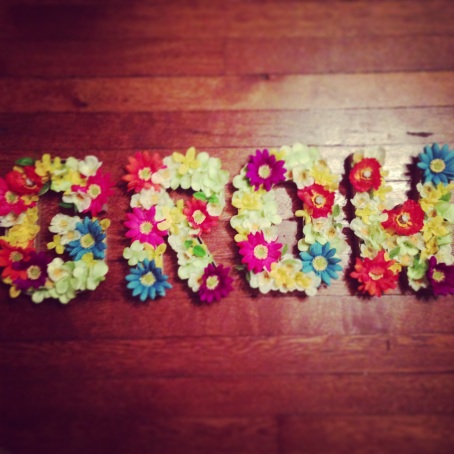
With the cold weather approaching, all of us are looking for a way to brighten up our surroundings. These floral letters are creative pieces of wallart and a way to add color to your apartment, bookcase or mantel!
First, here are all of the supplies you will need:
Cardboard Letters: $3 per letter
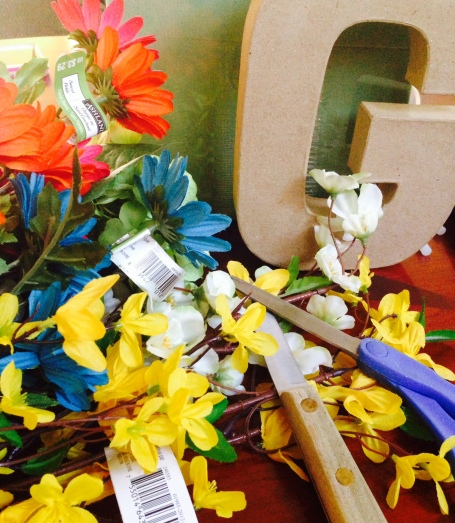
Flowers: $1 per bouquet
Floral Styrofoam: $6 for bulk package
Newspaper: FREE
Scissors/Knife: FREE
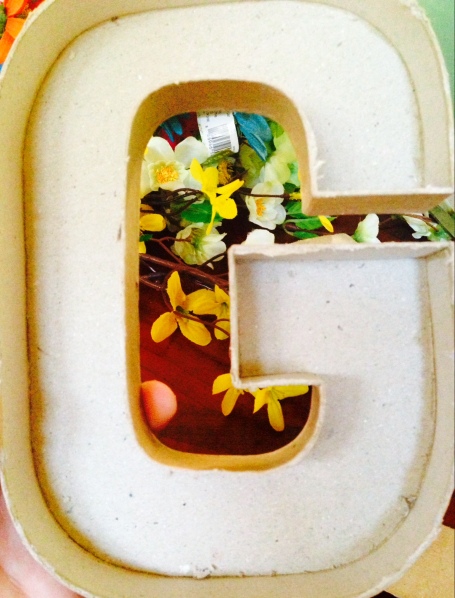
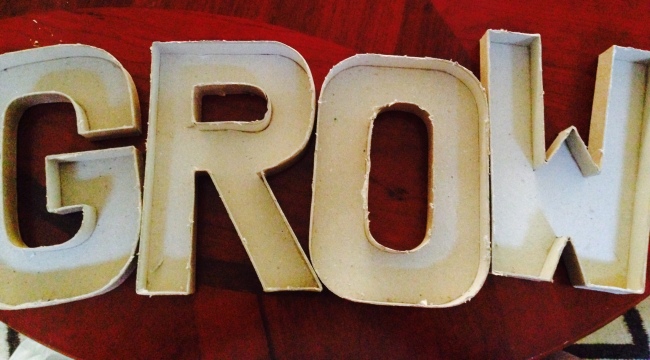
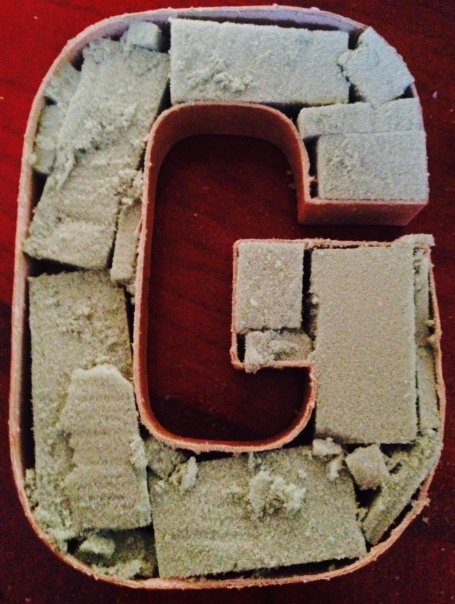
First, you will need to carefully cut the top of the cardboard letters off. You want to cut them so there is a well for you to place the floral styrofoam in. You may have to shape up the edges after you initially cut the top of the letters off.
Now, start to cut the floral styrofoam to fill the inside of the cardboard letters. If you are using letters with rounded edges like “G”, “R”, or “O”, make sure to fill in all the extra space with small pieces. Don’t worry it won’t look pretty at this point!
After this step you should cut the flowers and use the wire to secure them in the floral styrofoam. The wire of the flowers should be enough to keep them in place. You may need to experiment with different arrangements, so extra styrofoam is useful.
The total cost of this project is about $5 per letter. That is comparable to similar products you would find at Urban Outfitters or Anthropologie. These floral letters also make great housewarming gifts!
Promoting Blogs via Twitter
February 11, 2013 § Leave a comment
Martha Stewart Craft Google Alert
February 6, 2013 § 3 Comments
On February 5th, Marthastewart.com published a “Craft Of The Day” blog post. Most of the posts for the month of February have centered on homemade crafts for Valentine’s Day. The post on February 5th is about how to make “Heart-Shaped Soap.”
The post shows readers all the materials needed to make the craft. The steps to make the soap are also outlined in five easy steps within this post. With only five steps, this “Craft Of The Day” post makes it easy for readers to follow along and replicate the heart-shaped soap.
The blog also offers a video link for readers. The video is a more in depth description of how to make the handmade craft. Another great feature of the marthastewart.com blog are the links at the bottom of the page guiding readers to other crafts they may be interested in. The particular post “Heart-Shaped Soap” suggests readers to blog posts, “Bath Fizzies,” “Crayon Hearts,” and “Heart Bookmark.” This is a great way to keep readers on your website or blog as well as satisfy their need for crafting!
How To Make Etched Glassware
February 5, 2013 § 2 Comments
I am always trying to find an inexpensive way to turn cheap housewares into something that looks extraordinary. Ethching cream is an easy solution to transform simple and potentially boring glassware into one of a kind pieces.
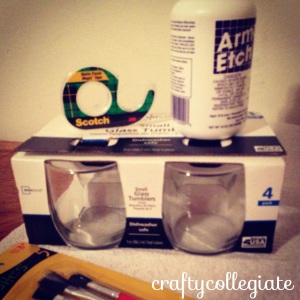
First these are the supplies you will need to create etched glassware:
- Glasses: $2.50 (4-pack from Wal-Mart)
- Tape/Stencil/Stickers: $2.00
- Paintbrushes: $2.00
- Etching Creme: $6.63 (inexpensive etching cream)
- Rubber Gloves: FREE (any type of hand protection will work)
- Newspaper: FREE
Total: $3.28 per glass
First, make sure the glasses are clean. The etching cream will stick better on clean glasses. Next, place the tape, stickers, or stencils on the glass. Once you have decided where you want the stencil, make sure it is completely secure. (This step is important if you are using a stencil. Tape the stencil down securely so the design is precise.)
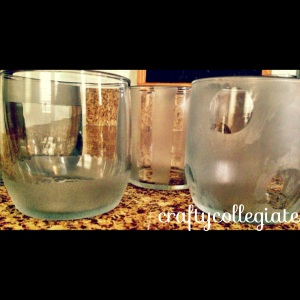
Now, with the rubber gloves on, use the paint brush to paint the etching cream on the glass. If you paint a thick layer on the glass it will take longer to dry and you may want to let the glasses dry over night. If you paint a thin layer on the glasses, the cream may completely dry in about 30 minutes.
Once the cream is dry, rinse the glasses with water. Make sure you are wearing rubber gloves while washing the glasses just in case they are still wet. The etching cream can cause burns or skin irritation while it is still wet, so its always better safe than sorry!
Believe it or not, you’re glasses are done. Its as easy as that, you have now turned your $2.50 glasses into one of a kind glassware!
What would you use etching cream on? I plan on trying to etch mason jars or a vase.
If you liked this craft be sure to check out my tutorial on Tinted Mason Jars or Glittered Mason Jars
Sports Team Wall Art
December 6, 2012 § Leave a comment
So after a long hiatus, I have finally had time to refocus back on the the crafty collegiate blog. I do have to apologize though, the pictures for this first project are less than quality. My camera has been experiencing some technical difficulties and I was forced to use my blackberry (yes, they still exist!) camera, so please bare with me.
Being from Cleveland, it is pretty much a given that my family and I have a love for this city. My brother specificially has an admiration for Cleveland sports teams. Also, this project couldn’t come at a better time considering the Browns are on a two game winning streak! (yes, in CLE we are happy with a two game winning streak) This first project can be altered to fit almost all sports teams.. so here goes!
First, the supplies you will need are…
Canvas 5.00 (7×14 Canvas, two in a pack)
Acrylic Paint 2.97 (.99 each)
Paint Brushes Free
Tape 2.00 (any kind of tape works)
Letter Stencils 3.00
Ruler Free
Newspaper Free
Total $10 for each project
Okay, first things first, make sure you have all of your supplies. Then, you have to section off your canvas so your different sections will be symetrical. For the Cleveland Browns design this was pretty simple. It doesn’t matter what size you make each section as long as the corresponding color on the other side is the same size. I used to tape to section off the different section on the canvas, this ensured that I would have straight lines. For the Browns sign I started with the orange first, then white and finally the brown stripes.
TIP! Make sure you allow each section to fully dry before you put tape on them to begin the other sections/stripes. It is also a good idea to wait for the sections to dry before you put another coat of paint on the canvas.
Before you being stenciling, check to see if your chosen word (Cleveland for my project) will fit on the canvas. Also, it’s okay if your letters overlap a bit. In my case, Cleveland wouldn’t fit on my canvas without overlapping. Once the sections/stripes are completely dry, tape down the stencils on the canvas to ensure they will not move while you are painting. Just like the tape, keep the stencils on the canvas until the paint is partially dry.
Once the stencils are removed, you may have to touch up some of the letters. I recommend using a small brush for this part.
As you can see from the picture above, I had to make some touch ups with my canvas. If you want the canvas to have a glossy finish, simply paint a coat (or two) of modge podge on top.
This craft is the perfect inexpensive christmas gift for the sports fan of any age! What sports teams would you use for this project?
A Little Bit of Organization
May 30, 2012 § 2 Comments
Whether you are going through final exam week or trying to find different ways to organize your office space. This budget friendly craft may be just the right one for you! At school, my folders and notebooks usually end up all over my room making it difficult to find materials when I was in a rush. This craft is a simple way to organize your things with a personalized touch!
First here are the materials you will need…
Cereal Box $FREE
Knife $FREE
Mod Podge $10 (Once you buy mod podge it will help with all different types of crafts in the future!)
Scrapbooking Paper $1-2 a sheet (12×12) You will need two pieces per cereal box.
Ruler $FREE ($1 at the dollar store or Walmart)
Sharpie/Marker $1.50
Paint Brush $1.00
Now you will have to use the sharpie and the ruler to mark the place where you would like to cut on the cereal box. I found it easiest to use a knife but if you have a box cutter that would work too. Scissors weren’t sharp enough to cut the cardboard evenly! I left about a half an inch from the top and extended that about 5 inches. After I extended the line I drew an angled line down to where I wanted the opening of the file holder to start.
Next, use the same measurements and mark the scrapbooking paper. TIP! Make sure that you leave a little extra (1/2) along the top edges of the paper so it can be wrapped around the cereal box.
Cut the other piece of paper the opposite way. Remember that the pieces will be on the different sides of the cereal box so they match up when they are glued on. Now, use the paint brush to bruch the mod podge onto the cereal box. I recommend working on one side at a time. TIP! Make sure you but a little bit of mod podge on the inside of the cereal box so the extra scrapbook paper has something to glue it down.
After you complete this step your file holders should be completed. If you would like you could paint the inside or line the inside to make it look more presentable. I plan on labeling the back of each of my file holders and have them sit on a shelf so there is no need to make the inside look pretty because no one will see them! You can also mix and match patterns if you make more than one file holder!
The total cost of this project is about $5 but that price can change depending on the materials you already own. Not to bad when file holders are priced anywhere from $10 – $30. You save $5 – $25 by recreating this craft instead of buying it in the store!
What would you use the file holders for? Would you change anything about this craft?
Make sure to keep checking my blog over summer for more updates on budget friendly, crafty collegiate crafts!
Happy Crafting!
DIY inspiration
May 23, 2012 § Leave a comment
I can’t say I am creative as I think I am. Often, I find a lot of my inspiration through other blogs online, pictures or Pinterest. My week has been very hectic and I hate to admit it but I haven’t had time to create a blog post with a craft for the day. I thought I would take sometime today to tell you about three of my favorite websites/blogs where I come across inspiration for the items I make!
First, The Beauty Department!
This blog is written by Lauren Conrad, Kristin Ess (LC’s hairstylist) and Amy Nadine (LC’s makeup stylist)! At first some may be a little hesitant to take all sorts of beauty, fashion and DIY advice from a girl from MTV’s hit shows Laguna Beach and The Hills, but do not let this stand in your way! I cannot say how much I love looking at their blog. Not only do they provide useful information about DIY, they also talk about fashion, hair, beauty as well as things like etiquette, packing tips and health tips. This blog is perfect for women of all ages and is a great blog to have in your reserves.
Second, I Spy DIY
This blog is (almost) strictly about fashion. A cool aspect about this blog is the fact that she [Jenni] tries to makes posts about crafts that won’t break the bank. Maybe I like this blog because it has a similar concept to my own? Another thing that I like so much about this blog is that she takes inspiration from current fashion and celebrities. This is nice because we all know its a bit tough to spend $$$ on a simple friendship bracelet that we learned how to make when we were 5 years old.
Last, but not least, Martha Stewart
I don’t think anyone could talk about DIY or crafting without mentioning Martha Stewart. As cliche as it may sound, she is the “godfather” or should I say “godmother” of DIY. If you are ever in a rut or need a quick DIY Marthastewart.com is the place to turn. Her crafts range from holiday decorations to crafts that one could recreate with children. (This is really helpful for summer babysitters!) Not only does her site post crafts, but the other sections include, food, entertaining, weddings, holiday, pets, home & garden and more! Her website is very organized and also has a search bar if you can’t find what you are looking for. I don’t think many people could deny the usefulness of Martha Stewart’s website…. she is Martha Stewart after all!
I hope this post helped you come up with some websites/blogs to reference when you are in need of some new and innovative DIY ideas!
Do you have any favorite blogs?
Happy Crafting!
Monochromatic Canvas
May 16, 2012 § 2 Comments
Trying to make a space feel more like home? An affordable way of doing this is adding some bright-colored canvases. Not only can you pick the color goes best with your room, you are able to personalize the quotes, lyrics or words that are on the canvas! I got my idea for this (almost) monochromatic canvas on Pinterest. The lyrics are from Mumford and Son’s “Sigh No More.”
First, here are the supplies you will need:
Canvas $9.99 (you can use any size, I chose to use a 16X20 canvas)
Paint $1.00 each ($2.00)
Paint Brush $2.00
Wooden Letters $3.00 per pack or 30 cents individually (I bought 3 packs and about 6 individual letters)
Tacky Glue $3.29 (this bottle will last you a long time, if possible buy the smaller bottle)
TIP! When buying the wood letters, make sure you write out your quote first and see how many of each letter you will need. For a simple word like “LOVE” you could purchase the individual wooden letters. Because my quote was so long, I found it easier to buy three separate backs of wooden letters and a few extra miscellaneous ones.
Now, you will want to lay out the letters on the canvas to make sure you know how they will fit and where you will want them to be placed.
Next, you will want to paint the background of the canvas. While you are waiting for that dry you will want to start painting the letters too. I chose to mix a little bit of white into the orange for the letters to make sure that the orange wouldn’t turn out too dark after being painted on the wood. Use your personal judgement about drying time when it comes to the canvas and the letters. They should both be dry to the touch.
TIP! If using multiple colors, make sure you set the different words/letters a part from the others so you don’t mistakenly paint them the wrong color!
Now, Lay out the letters on the canvas again for spacing. Glue them down one buy one to make sure that you are keeping consistent with the lines and other letters.
Finally, you must be patient and wait for the glue to dry before you can hang the canvas on the wall or place on a mantel.
The total cost of the monochromatic canvas was about $28.08. When compared to a canvas of this size that is sold in stores, you will save about $20-$40!
What kind of quotes or lyrics would you use? Would you make any changes to the letters or the canvas?
Happy Crafting!
Sparkly Mason Jar
May 9, 2012 § 4 Comments
Needless to say, I love trying to come up with different ways to re-invent the use of the Mason Jar. This is my second post about mason jars and I feel that anyone can find a cool place in their dorm or home for this craft. I have a weird obsession with sparkles and glitter…
The mason jar on the far right is from my DIY post on tinting mason jars. The two on the left are what I’ll be explaining in this post. Some of the different ways you can use mason jars include; flower vase, votive holder, makeup brush holder, pencil/pen holder, container for cosmetic items (cotton balls, Q tips, etc.), keeping change, etc. So first, here are the supplies you will need.
Mason Jar: $10-$12 (They usually come in a pack of about 9 or 12)
Mod Podge: $10 (Like I always say, invest in this now and it will last forever for so many different crafts!)
Glitter: $4.99 (I bought the large size, the smaller one would have been more than enough and it was $2.99)
Paint Brush: $1.99
Small Bowls: $FREE
Tape: $FREE
Rubbing Alcohol: $FREE (I cleaned the outside of the jar to make sure the glitter stuck well)
Now, put the tape on the mason jar where you do NOT want the glitter. You can get as creative as you want with this step. I only made two of the sparkly mason jars so I made them contrasting.
Next, paint the mod podge on to the parts of the mason jar that is not covered by tape. After that sprinkle the glitter on the mod podge. If you have a large enough bowl, I would reccomend rolling the mason jar in glitter. This would result in even coverage and less mess!
Let the glitter dry a little. I let mine sit for about 10-15 minutes but it depends on how much mod podge you used. Next, apply another coat of mod podge on top of the glitter to ensure that it stays put.
Once again, let the modge podge dry again. The magic of mod podge is that it becomes clear when it is dry. The trick with this project is to take the tape off before the mod podge and glitter are completely dry so that you can still pull it off the mason jar.
After you take the tape off of the mason jar, let them sit until completely dry. Individually these mason jars cost about $2.99 a piece, this cost will change if you already own some of the supplies like mod podge and a paint brush!
How would you use a sparkly mason jar? Would you use a different pattern to apply the glitter?
Happy Crafting!
American Flag Cutoffs
May 2, 2012 § 2 Comments
I have recently seen American flag styled shorts all over different blogs as well as Pinterest. The only problem is none of the posts have given good step-by-step instruction on how to to recreate these patriotic shorts. These babies can be worn during a fest, on the Fourth of July or even paired with a basic v-neck tee for a relaxed and casual look!
The first thing you will need for this craft is a pair of cutoff denim shorts. If you do not currently own a pair, refer to my previous post on how to make your own!
Next, here are all the supplies you will need…
Price List:
Denim Shorts: $2.99/FREE
Fabric Paint: $3.47 (x2)
Scisccors: FREE
Tape: FREE
Paper: FREE
1. Lay down the tape on the denim so that you have (almost) consistent lines. Remember that not everything about this project has to be perfect. I honestly believe that the shorts look a little bit better when they look a little worn.
2. Use the fabric paint as directed by the directions on the bottle. I spread the paint with my finger but if you want more even coverage I would suggest using a paint brush.
3. Cut out any type of star that you wish. You can put as many stars as you want on the cutoffs, this step is up to your discretion. Once you have cut out the stars, tape them onto the cutoffs. Now paint around the stars just like you did with the tape. I suggest that you do a small amount of paint at first because you can always add more.
Now, this is where I think I went wrong. I let the shorts dry with the paper stars still attached. If I were to make the cutoffs again I would remove the stars after the paint dried for 10 to 20 minutes so I could still touch up the paint surround the area of the star. I still have a little bit of paper attached to my cutoffs and it probably won’t come off until I run them through the wash. The fabric paint I bought said to wait 72 hours until washing. Also, I would use a lighter colored denim jean as well as less paint when recreating this craft.
The total cost of this project was $10– not too bad considering they cost about $50-$100 in stores!
I honestly can’t wait to wear the American flag inspired cutoffs with a gray v-neck in the warm weather! What would you pair with these shorts?
Happy Crafting!

